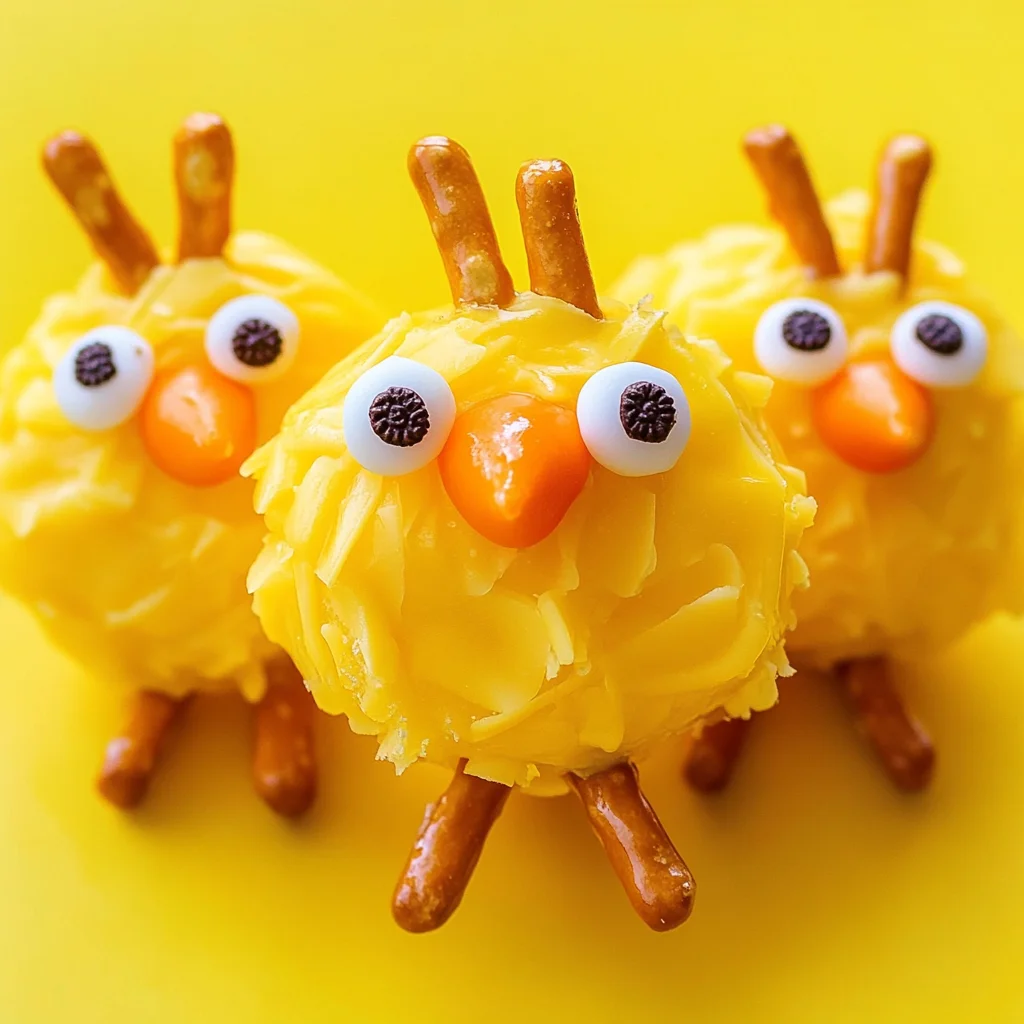
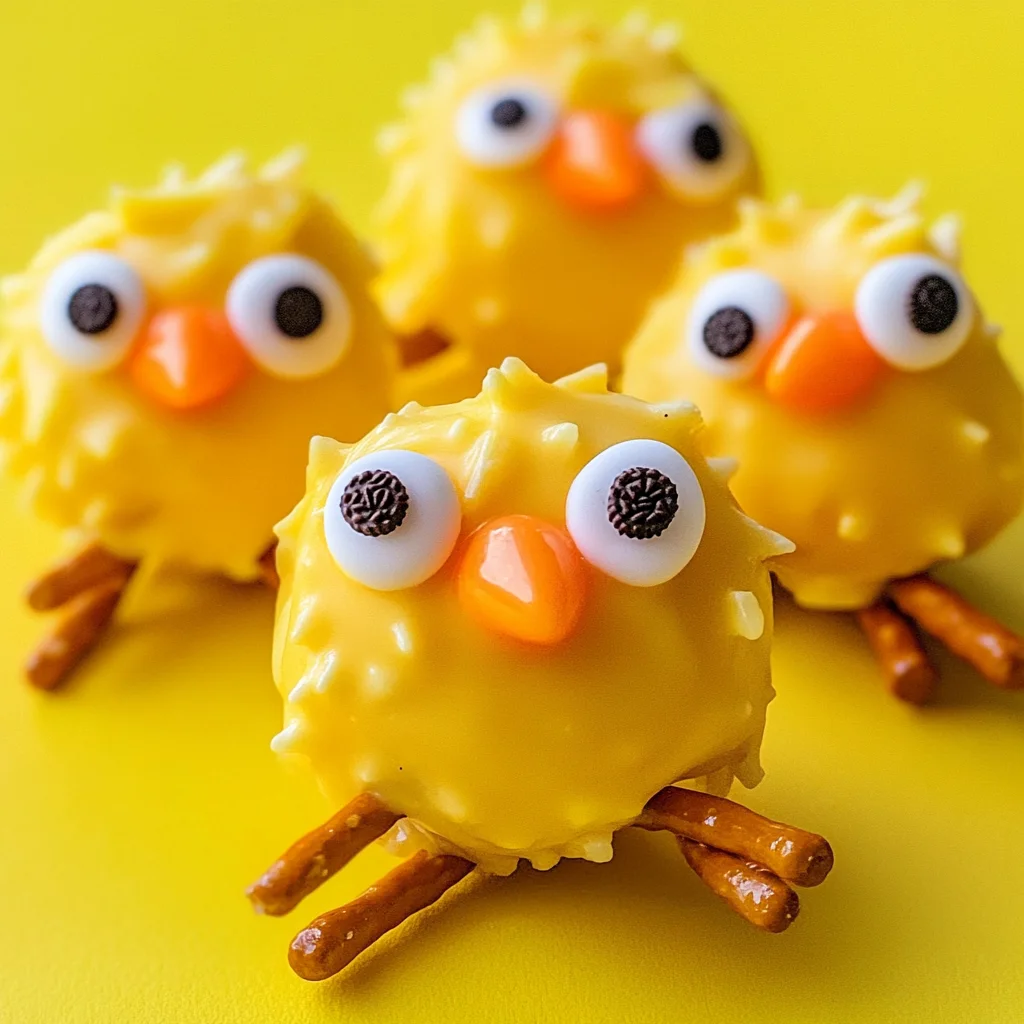
Oreo Easter Chicks
Oreo Easter Chicks are a delightful and creative way to celebrate Easter! These adorable treats transform classic Oreo cookies into charming little chicks, making them perfect for festive gatherings, kids’ parties, or simply to enjoy at home. With their vibrant yellow coating and cute pretzel legs, these treats are sure to stand out at any occasion.
Why You’ll Love This Recipe
- Fun to Make: Involve the whole family in crafting these whimsical Oreo Easter Chicks.
- Eye-Catching Appearance: The bright yellow and playful design make them a hit for any event.
- Quick Preparation: Ready in just 20 minutes, they are perfect for last-minute celebrations.
- Delicious Flavor: A delightful combination of chocolate and candy melts makes every bite scrumptious.
- Versatile Treats: Great for Easter, birthday parties, or simply as a fun snack.
Tools and Preparation
To create your Oreo Easter Chicks, you’ll need a few simple tools. Having the right equipment will streamline the process and ensure that your treats turn out perfectly.
Essential Tools and Equipment
- Baking sheet
- Wax paper
- Microwave-safe bowl
- Spoon or spatula
Importance of Each Tool
- Baking sheet: Provides a flat surface for setting your dipped Oreos without mess.
- Wax paper: Prevents sticking and allows for easy cleanup after dipping.
- Microwave-safe bowl: Ensures safe melting of candy melts without damaging the container.
- Spoon or spatula: Useful for dipping Oreos and spreading melted candy evenly.
Ingredients
Oreo Easter Chicks are made with just a few simple ingredients that come together to create a delightful treat.
For the Chicks
- 1-2 bags yellow candy melts
- 1 package double-stuff oreos
- mini chocolate chips
- thin pretzel rods (broken into short pieces)
- orange decorating gel or orange candy melts
How to Make Oreo Easter Chicks
Step 1: Melt the Candy Melts
Melt the yellow candy melts according to package directions. Place a piece of wax paper on a baking sheet to prepare for dipping.
Step 2: Dip the Oreos
Dip each Oreo cookie into the melted candy melts, ensuring it is completely covered in yellow. Once coated, place it on the wax paper.
Step 3: Assemble the Chicks
Quickly stick two broken pretzel pieces into each dipped Oreo to create legs. Add two mini chocolate chips as eyes while the candy coating is still wet.
Step 4: Create Beaks
Use orange decorating gel or melted orange candy melts to draw beaks on your chicks.
Step 5: Chill to Set
Place your assembled Oreo Easter Chicks in the refrigerator to set until firm. Enjoy these delightful treats once they’re ready!
With this fun recipe at hand, you can easily make Oreo Easter Chicks that will delight both kids and adults alike!
How to Serve Oreo Easter Chicks
Oreo Easter Chicks are not only delightful to eat but also a joyful centerpiece for any Easter celebration. Here are some fun serving suggestions to elevate your treat experience.
Festive Dessert Table
- Create a vibrant dessert table featuring Oreo Easter Chicks alongside other colorful sweets. This setup will wow your guests and create a festive atmosphere.
Easter Basket Treats
- Place Oreo Easter Chicks in small baskets filled with grass-like shredded paper. This makes for an adorable gift that kids will love to find.
Party Favors
- Wrap individual Oreo Easter Chicks in clear cellophane bags tied with pastel ribbons. These make perfect party favors for guests to take home after the celebration.
Themed Plates
- Serve Oreo Easter Chicks on plates decorated with Easter motifs, such as bunnies or eggs, to add an extra layer of charm to your presentation.
How to Perfect Oreo Easter Chicks
To ensure your Oreo Easter Chicks turn out perfectly every time, consider these helpful tips.
- Choose Quality Ingredients: Use high-quality yellow candy melts and fresh Oreos for the best flavor and appearance.
- Mind the Temperature: Make sure the melted candy melts are warm but not too hot. If they cool too much, they won’t coat the Oreos properly.
- Work Quickly: Once you dip the Oreos in candy melts, act fast! The candy sets quickly, so add pretzel legs and chocolate chip eyes before it hardens.
- Experiment with Colors: Feel free to use different colored candy melts for various themes or occasions, making them versatile beyond just Easter.
- Chill Before Serving: Allow the assembled chicks to chill in the refrigerator until set. This helps maintain their shape during serving.
Best Side Dishes for Oreo Easter Chicks
Oreo Easter Chicks pair well with a variety of side dishes that complement their sweetness. Here are some great options to serve alongside them.
- Fruit Salad
A refreshing mix of seasonal fruits adds a healthy balance to the sweet treats. - Carrot Sticks with Hummus
Crunchy carrot sticks served with creamy hummus offer a satisfying contrast and keep things light. - Mini Veggie Platter
An assortment of colorful vegetables paired with a tangy dip provides a crunchy side that all ages can enjoy. - Cheese Cubes and Crackers
A platter of assorted cheese cubes alongside crispy crackers creates a savory option that pairs well with sweet desserts. - Chocolate-Covered Strawberries
These treats bring more chocolate goodness into your spread while still feeling elegant and festive. - Lemonade or Fruit Punch
A refreshing drink like lemonade or fruit punch complements the sweetness of Oreo Easter Chicks perfectly, keeping everyone hydrated during celebrations. - Rice Krispie Treats
These chewy bars are easy to make and provide another fun texture alongside your chick-themed delights. - Popcorn Mix
Create a mix of popcorn drizzled with white chocolate and sprinkles as a crunchy snack that’s fun for all ages!
Common Mistakes to Avoid
Making Oreo Easter Chicks can be a delightful experience, but it’s important to avoid common pitfalls.
- Not melting the candy properly: If the candy melts are overheated or not melted enough, they won’t coat the Oreos well. Follow package instructions carefully for best results.
- Skipping the wax paper: Placing dipped Oreos directly on a baking sheet can cause sticking. Always use wax paper to ensure easy removal after setting.
- Rushing the decoration: Allow the candy coating to set slightly before adding pretzel legs and chocolate chip eyes. This prevents them from slipping off.
- Ignoring storage guidelines: Storing Oreo Easter Chicks in improper containers can affect their texture. Use airtight containers for best freshness.
- Overloading on decorations: While it’s tempting to add more features, too many decorations can make them visually crowded. Keep it simple for a cleaner look.
Storage & Reheating Instructions
Refrigerator Storage
- Store in an airtight container.
- Can be kept for up to 1 week in the refrigerator.
Freezing Oreo Easter Chicks
- Place in a freezer-safe container or bag.
- They can be frozen for up to 3 months.
Reheating Oreo Easter Chicks
- Oven: Preheat to 350°F (175°C) and place on a baking sheet for about 5 minutes.
- Microwave: Heat in short bursts of 10-15 seconds until just warm.
- Stovetop: Not recommended as it may affect the chocolate coating.
Frequently Asked Questions
If you have questions about making Oreo Easter Chicks, you’re not alone! Here are some frequently asked ones:
What are Oreo Easter Chicks?
Oreo Easter Chicks are fun, chocolate-covered Oreos decorated to resemble cute chicks using yellow candy melts and pretzel pieces.
Can I customize my Oreo Easter Chicks?
Absolutely! You can decorate them with different colored candy melts or add sprinkles for an extra festive touch.
How long do Oreo Easter Chicks last?
They stay fresh for up to one week in the refrigerator or three months if frozen properly.
Are there alternative ingredients for allergens?
Yes, feel free to substitute candy melts with allergen-free options like dairy-free chocolate if needed.
Final Thoughts
Oreo Easter Chicks bring a playful twist to traditional treats, making them perfect for any celebration. Their versatility allows you to customize decorations and flavors easily. Give this recipe a try and enjoy creating these delightful snacks!
Oreo Easter Chicks

Oreo Easter Chicks are an irresistible and playful treat that will brighten up any celebration! These delightful cookies transform classic Oreo cookies into adorable chick-themed treats, perfect for Easter gatherings, kids’ parties, or just a fun afternoon snack. With a vibrant yellow candy coating and cute pretzel legs, these sweet creations are not only visually appealing but also incredibly easy to make in just 20 minutes. Enjoy the scrumptious combination of chocolate and candy melts with every bite, making them a hit among both kids and adults alike. Whether you’re presenting them on a festive dessert table or gifting them in cheerful baskets, Oreo Easter Chicks are sure to bring smiles all around!
- Prep Time: 15 minutes
- Cook Time: 5 minutes
- Total Time: 20 minutes
- Yield: Makes approximately 12 Oreo Easter Chicks 1x
- Category: Dessert
- Method: No-bake
- Cuisine: American
Ingredients
- 1–2 bags yellow candy melts
- 1 package double-stuff Oreos
- Mini chocolate chips
- Thin pretzel rods (broken into short pieces)
- Orange decorating gel or orange candy melts
Instructions
- Melt the yellow candy melts according to package instructions. Prepare a baking sheet lined with wax paper.
- Dip each Oreo cookie into the melted candy melts until fully coated, then place it on the wax paper.
- Quickly insert two broken pretzel pieces into each dipped Oreo for legs and add two mini chocolate chips as eyes while the coating is still wet.
- Use orange decorating gel or melted orange candy melts to draw beaks on your chicks.
- Chill in the refrigerator until firm before serving.
Nutrition
- Serving Size: 1 serving
- Calories: 150
- Sugar: 12g
- Sodium: 50mg
- Fat: 7g
- Saturated Fat: 4g
- Unsaturated Fat: 2g
- Trans Fat: 0g
- Carbohydrates: 18g
- Fiber: 0g
- Protein: 1g
- Cholesterol: 0mg