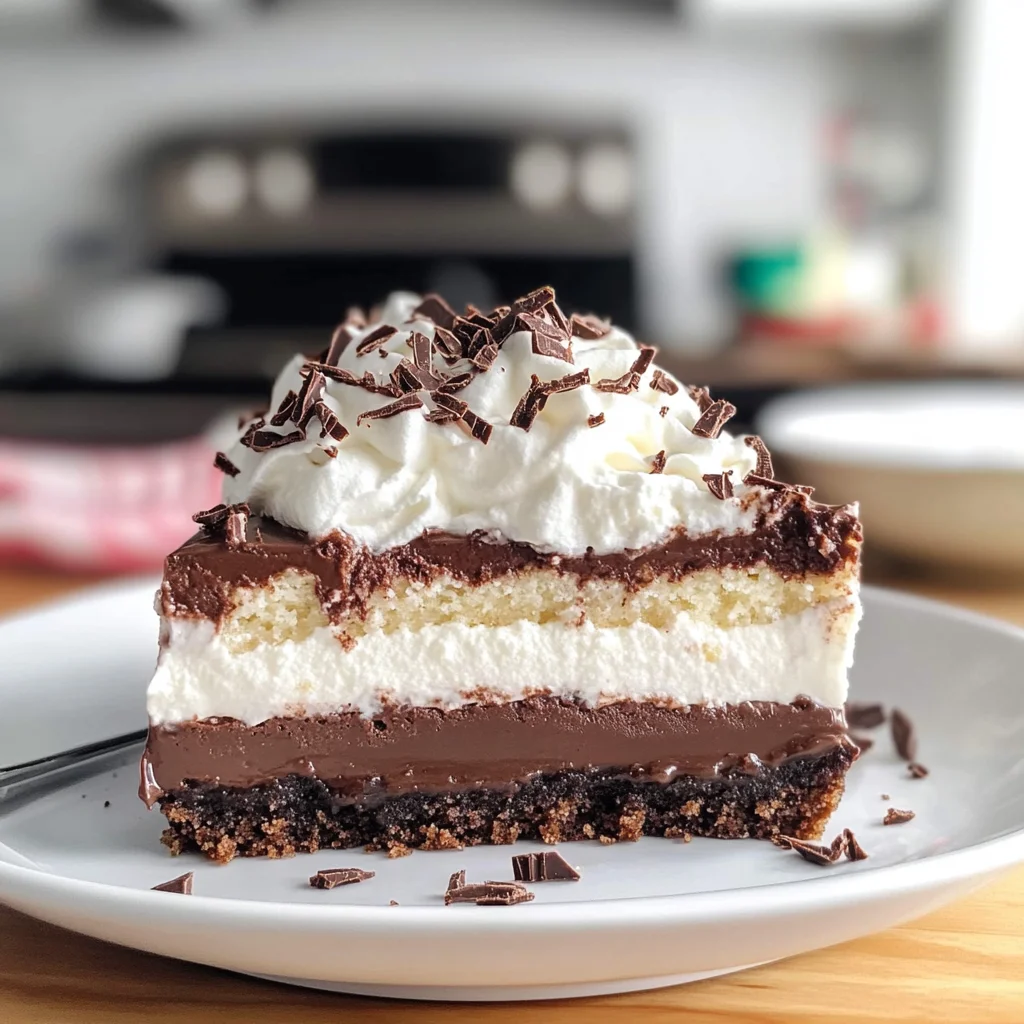
Layered Chocolate Pudding Dessert
Layered Chocolate Pudding Dessert is a delightful treat that layers a sweet cookie crust with smooth cream cheese, rich chocolate pudding, and airy whipped topping. This dessert is perfect for any occasion, whether it’s a family gathering, a dinner party, or just a sweet indulgence at home. Its creamy texture and chocolatey flavor make it a lasting favorite that everyone will love!
Why You’ll Love This Recipe
- Easy to Make: This dessert requires simple steps and common ingredients, making it accessible for bakers of all levels.
- Decadent Flavor: The combination of chocolate pudding and cream cheese creates a rich and satisfying taste that’s hard to resist.
- Versatile Dessert: Perfect for birthdays, holidays, or casual get-togethers, this layered chocolate pudding dessert fits any occasion.
- Crowd-Pleaser: With its delicious layers and eye-catching presentation, it’s sure to impress your guests and family alike.
- No Baking Skills Required: Even novice cooks can create this stunning dessert without the stress of complicated techniques.
Tools and Preparation
Before diving into the recipe, gather your essential tools. Having everything ready will streamline the process and ensure you have fun while making this Layered Chocolate Pudding Dessert!
Essential Tools and Equipment
- 9×13-inch baking dish
- Mixing bowls
- Electric mixer
- Whisk
- Fork
Importance of Each Tool
- 9×13-inch baking dish: The perfect size for layering the crust, cream cheese mixture, and pudding evenly.
- Electric mixer: Makes whipping cream cheese and blending ingredients effortless for a smooth texture.
- Whisk: Ideal for combining pudding mixes with milk quickly and effectively.
Ingredients
Layered Chocolate Pudding Dessert features several tasty components that come together to create an unforgettable treat.
For the Crust
- 1 cup all-purpose flour
- 1 cup powdered sugar
- 1 stick butter, melted
For the Cream Cheese Layer
- 1 cup powdered sugar
- 8 ounces cream cheese
- 8 ounces of whipped topping (1/2 of a large 16 ounce container)
For the Pudding Layer
- 1 (3.4 ounce) box vanilla instant pudding
- 1 (3.4 ounce) box chocolate instant pudding
- 3 cups cold milk
For Topping
- 8 ounces whipped topping (remaining 1/2 of a large 16 ounce container)
- Chocolate sprinkles
How to Make Layered Chocolate Pudding Dessert
Step 1: Preheat the Oven
Preheat your oven to 350°F. Grease your 9×13-inch baking dish with butter or shortening to prepare for the crust layer.
Step 2: Make the Crust Layer
- Place the flour, powdered sugar, and melted butter directly in the greased baking dish.
- Mix with a fork until combined; then use your hands to form a thick dough.
- Press the dough evenly across the bottom of your baking dish.
- Bake for 15-18 minutes until lightly browned but slightly undercooked. Let it cool completely.
Step 3: Prepare the Cream Cheese Layer
In a large mixing bowl:
1. Beat together the powdered sugar, cream cheese, and half of the whipped topping until smooth and creamy.
2. Spread this mixture evenly over the cooled crust layer.
Step 4: Create the Pudding Layer
In another bowl:
1. Whisk together one package each of vanilla instant pudding and chocolate instant pudding with 3 cups of cold milk for about 2 minutes.
2. Refrigerate for 5 minutes before spreading it over the cream cheese layer.
Step 5: Finish with Topping
Top off your dessert with the remaining half of whipped topping:
1. Spread evenly over the pudding layer.
2. Garnish with chocolate sprinkles for an extra touch!
Step 6: Chill Before Serving
Store your Layered Chocolate Pudding Dessert in the refrigerator until you’re ready to serve! Enjoy this delightful treat chilled for maximum flavor!
How to Serve Layered Chocolate Pudding Dessert
Layered Chocolate Pudding Dessert is a crowd-pleaser that can be served in a variety of ways. Whether you’re hosting a dinner party or enjoying a family gathering, these serving suggestions will enhance your dessert experience.
Individual Servings
- Use small cups or jars for individual servings. This makes it easy for guests to enjoy their own portion without having to cut into the main dish.
Family Style
- Serve directly from the baking dish. This encourages sharing and allows everyone to help themselves, making it perfect for casual gatherings.
Garnished Plates
- Plate individual portions and garnish with fresh fruit or additional chocolate sprinkles. This adds a touch of elegance and elevates the presentation.
Dessert Bar
- Create a dessert bar with layering options. Set out bowls of toppings like crushed cookies, chocolate chips, or fresh berries, allowing guests to customize their desserts.
How to Perfect Layered Chocolate Pudding Dessert
To achieve the ultimate Layered Chocolate Pudding Dessert, follow these tips for the best results.
- Chill between layers: Allow each layer to set in the refrigerator for at least 30 minutes before adding the next layer. This helps maintain distinct layers and enhances texture.
- Use room temperature ingredients: For smoother mixing, let cream cheese and whipped topping sit at room temperature before combining them.
- Adjust sweetness: Taste the cream cheese layer before spreading it on the crust. If you prefer it sweeter, add more powdered sugar gradually until you reach your desired sweetness.
- Opt for high-quality cocoa: Using high-quality cocoa powder in your chocolate pudding will enhance the flavor depth of your dessert.
- Refrigerate before serving: Allow your dessert to chill for a few hours or overnight. This helps all flavors meld together beautifully.
Best Side Dishes for Layered Chocolate Pudding Dessert
Pairing side dishes with your Layered Chocolate Pudding Dessert can create a well-rounded meal experience. Here are some delightful options that complement this sweet treat.
- Fresh Fruit Salad: A mix of seasonal fruits adds freshness and balances the richness of the dessert.
- Vanilla Ice Cream: Serve alongside a scoop of vanilla ice cream for an extra creamy texture that pairs beautifully with chocolate.
- Chocolate-Covered Strawberries: These decadent bites not only look stunning but also enhance the chocolate theme.
- Coffee or Espresso: A warm cup of coffee or espresso can provide a nice contrast to the sweetness of the pudding dessert.
- Mini Cheesecakes: Light mini cheesecakes can offer another layer of flavor while remaining light enough not to overpower the main dessert.
- Nutty Biscotti: Crunchy biscotti are perfect for dipping into coffee, providing a satisfying crunch alongside your pudding dessert.
- Caramel Sauce Drizzle: A drizzle of salted caramel sauce on top of each serving adds an extra layer of indulgence.
- Whipped Cream Topping: While already included in your dessert, an extra dollop on the side can enhance both presentation and taste!
Common Mistakes to Avoid
Avoiding mistakes in your Layered Chocolate Pudding Dessert will ensure a smooth and delightful experience. Here are some common pitfalls:
- Skipping the Cooling Step: Not allowing the crust to cool completely can lead to a soggy dessert. Always let it cool for at least 30 minutes before adding layers.
- Overmixing Cream Cheese: Be careful not to overbeat the cream cheese mixture, which can cause it to become too runny. Mix until just combined for the right consistency.
- Improper Measuring of Ingredients: Accurate measurements are crucial. Use measuring cups and spoons for precise ingredient ratios to achieve perfect layers.
- Not Chilling Layers Properly: Failing to chill the pudding layer before adding the whipped topping can result in a messy presentation. Always refrigerate after each layer is added.
- Using Warm Milk: Ensure your milk is cold when mixing with pudding. Warm milk can prevent the pudding from setting properly.

Storage & Reheating Instructions
Refrigerator Storage
- Store your Layered Chocolate Pudding Dessert in an airtight container.
- It will last up to 3-5 days in the refrigerator.
Freezing Layered Chocolate Pudding Dessert
- You can freeze individual portions in freezer-safe containers.
- The dessert will keep well for up to 2 months, but texture may change upon thawing.
Reheating Layered Chocolate Pudding Dessert
- Oven: Not recommended as this dessert is best served cold.
- Microwave: If needed, microwave individual portions for about 10 seconds on low power.
- Stovetop: Not applicable; serving chilled is ideal.
Frequently Asked Questions
If you have questions about making this delicious dessert, you’re in the right place! Here are some frequently asked queries.
What is a Layered Chocolate Pudding Dessert?
A Layered Chocolate Pudding Dessert consists of multiple layers, including a cookie crust, creamy filling, chocolate pudding, and whipped topping. It’s a delicious treat perfect for any occasion.
Can I make this dessert ahead of time?
Yes! This dessert can be made a day in advance. Just make sure to store it covered in the refrigerator to keep it fresh.
How long does the Layered Chocolate Pudding Dessert last?
When stored properly in the refrigerator, it lasts for about 3-5 days. For longer storage, consider freezing portions.
Can I customize my Layered Chocolate Pudding Dessert?
Absolutely! You can add fruits like bananas or strawberries between layers or use different flavored puddings for variety.
Is this recipe suitable for large gatherings?
Yes! The Layered Chocolate Pudding Dessert is easy to double or triple, making it perfect for parties or family gatherings.
Final Thoughts
This Layered Chocolate Pudding Dessert is not just delicious; it’s also versatile and easy to make! You can customize it with your favorite flavors or toppings. We encourage you to try out this delightful recipe at your next gathering!
Layered Chocolate Pudding Dessert
Indulge in this Layered Chocolate Pudding Dessert, a delightful treat that combines a crunchy cookie crust with velvety cream cheese, luscious chocolate pudding, and fluffy whipped topping. Perfect for any gathering or a sweet night in, this no-bake dessert is easy to make and sure to please everyone’s taste buds. The rich layers not only create an inviting presentation but also tantalize your palate with each spoonful. Whether you’re celebrating a special occasion or simply wish to satisfy a chocolate craving, this dessert is an irresistible choice!
- Prep Time: 20 minutes
- Cook Time: 18 minutes
- Total Time: 38 minutes
- Yield: Approximately 12 servings 1x
- Category: Dessert
- Method: Baking
- Cuisine: American
Ingredients
- 1 cup all-purpose flour
- 1 cup powdered sugar
- 1 stick melted butter
- 8 ounces cream cheese
- 1 cup powdered sugar (for cream cheese layer)
- 8 ounces whipped topping (divided)
- 1 box vanilla instant pudding (3.4 ounces)
- 1 box chocolate instant pudding (3.4 ounces)
- 3 cups cold milk
- Chocolate sprinkles for garnish
Instructions
- Preheat the oven to 350°F. Grease a 9×13-inch baking dish.
- In the baking dish, combine flour, powdered sugar, and melted butter. Mix until dough forms and press evenly into the bottom. Bake for 15-18 minutes until lightly browned; let cool completely.
- In a bowl, beat together cream cheese and powdered sugar until smooth. Fold in half of the whipped topping and spread over the cooled crust.
- Whisk together both pudding mixes with cold milk for about 2 minutes; let sit for 5 minutes before spreading over the cream cheese layer.
- Top with remaining whipped topping and garnish with chocolate sprinkles.
- Chill in the refrigerator until ready to serve.
Nutrition
- Serving Size: 1 slice (115g)
- Calories: 230
- Sugar: 22g
- Sodium: 120mg
- Fat: 10g
- Saturated Fat: 6g
- Unsaturated Fat: 4g
- Trans Fat: 0g
- Carbohydrates: 30g
- Fiber: 0g
- Protein: 3g
- Cholesterol: 25mg