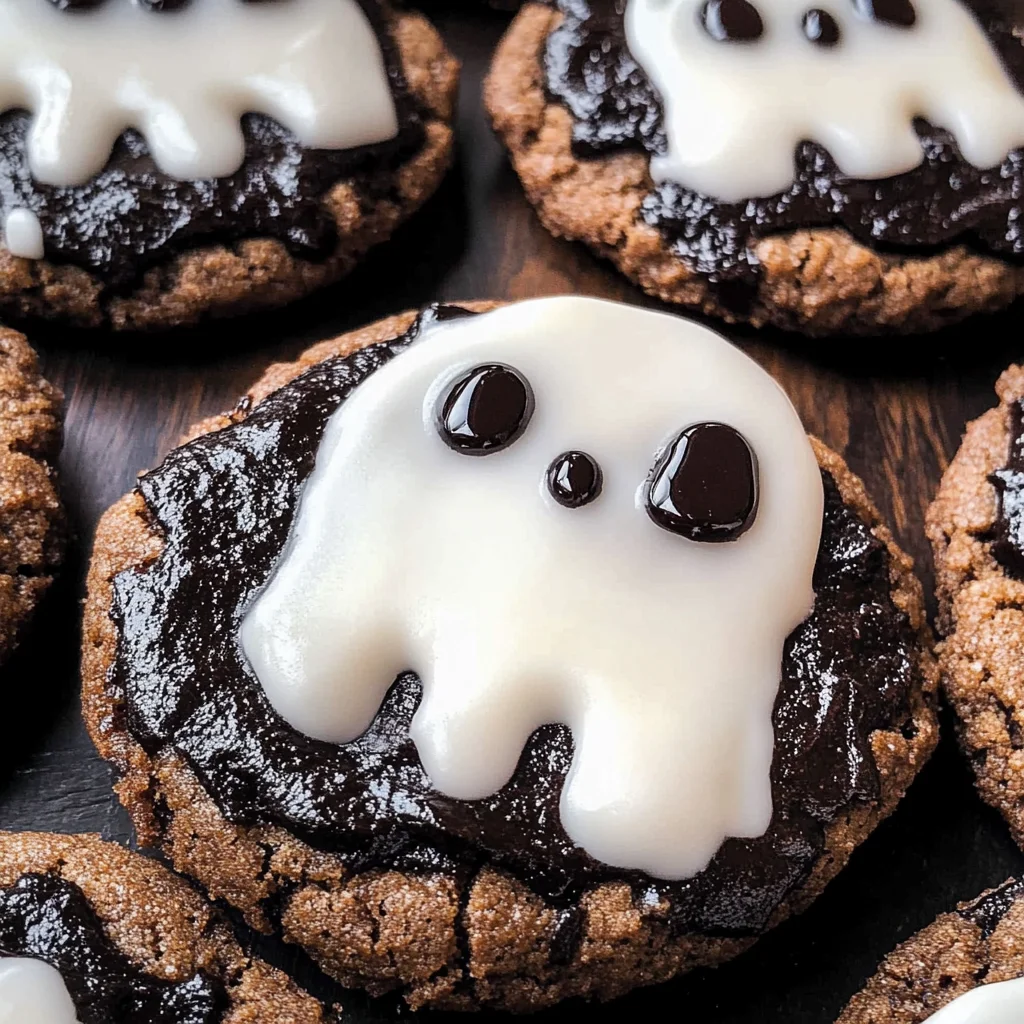
Ghost cookies
Ghost cookies are the perfect spooky treat for Halloween, combining fun and flavor in every bite. These delightful cookies are not only easy to make but also allow you to unleash your creativity with decorating. Ideal for parties or family gatherings, they bring a festive spirit that everyone will love. Let’s dive into this simple recipe that turns regular cookies into ghoulish delights!
Why You’ll Love This Recipe
- Easy to Make: With just a few ingredients and minimal prep time, these ghost cookies are a breeze to whip up.
- Fun Decoration: Get creative with the black writing icing! You can personalize each cookie for added fun.
- Perfect for Any Occasion: Whether it’s a Halloween party or just a fun afternoon activity, these treats fit perfectly.
- Kid-Friendly: Involve the little ones in baking and decorating; they will love making their own spooky treats!
- Delicious and Sweet: The combination of chocolate chunk cookies and marshmallows creates an irresistible flavor.
Tools and Preparation
Before you start baking your ghost cookies, gather your tools to ensure a smooth process.
Essential Tools and Equipment
- Mixing bowl
- Baking sheet
- Parchment paper
- Spatula
- Measuring scale
Importance of Each Tool
- Mixing bowl: Essential for combining ingredients evenly, ensuring no clumps remain.
- Baking sheet: Provides a sturdy base for your cookies as they bake to perfection.
- Parchment paper: Prevents sticking and makes cleanup a breeze.
- Spatula: Helps transfer your cookies without breaking them.
Ingredients
To create these delightful ghost cookies, you will need the following ingredients:
For the Ghost Cookies
- 175g icing sugar
- 1 x 200g pack chocolate chunk cookies
- 9 vegan marshmallows (regular size)
- black writing icing
How to Make Ghost Cookies
Step 1: Prepare Your Work Area
Begin by preheating your oven to 180°C (350°F). Line your baking sheet with parchment paper for easy cleaning.
Step 2: Decorate Your Marshmallows
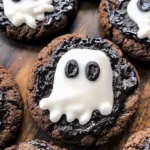
While the oven is heating, take the vegan marshmallows. Using the black writing icing, draw spooky faces on each marshmallow. Set them aside.
Step 3: Assemble the Cookies
Take each chocolate chunk cookie, and place it on the prepared baking sheet.
Step 4: Add Icing Sugar
In a mixing bowl, add the icing sugar. You can use a small sieve to dust it over the cookies lightly. This will give them an eerie ghostly appearance.
Step 5: Top with Marshmallows
Once you’ve decorated the cookies with icing sugar, place one decorated marshmallow on top of each cookie.
Step 6: Final Touches
After assembling all your ghost cookies, place them in the preheated oven for about 5 minutes. This will slightly melt the marshmallow, allowing it to stick securely to the cookie.
Step 7: Cool and Serve
Remove from oven and let cool completely before serving. Enjoy these spooky treats at your next Halloween gathering!
With this simple recipe, you’ll have delicious ghost cookies that are sure to impress both kids and adults alike!
How to Serve Ghost cookies
These Ghost cookies are perfect for Halloween parties or festive gatherings. Here are some fun serving suggestions to make your spooky treats even more delightful.
Creative Platter Ideas
- Spooky Cookie Display: Arrange the Ghost cookies on a black or orange platter for a visually striking centerpiece.
- Themed Dessert Table: Include your Ghost cookies alongside other Halloween-themed treats like pumpkin cupcakes and ghostly meringue cookies.
Fun Pairings
- Hot Chocolate: Serve with a steaming cup of hot chocolate topped with whipped cream for a cozy treat.
- Fruit Punch: Pair your cookies with a refreshing fruit punch for a sweet contrast.
Unique Presentation
- Cookie Bags: Package individual Ghost cookies in clear bags tied with orange ribbons for party favors.
- Ghostly Sticks: Insert lollipop sticks into the bottom of the cookies to create ghost pops that kids will love.
How to Perfect Ghost cookies
To ensure your Ghost cookies turn out perfectly every time, follow these helpful tips.
- Use Fresh Ingredients: Always check the expiry dates on your ingredients, especially the marshmallows and icing sugar, for the best flavor and texture.
- Chill Before Decorating: Let your cookies cool completely before adding decorations, which helps prevent melting.
- Practice Piping: If using black writing icing for details, practice on parchment paper first to perfect your piping technique.
- Store Properly: Keep decorated cookies in an airtight container at room temperature to maintain freshness and avoid sticking.
Best Side Dishes for Ghost cookies
Ghost cookies can be complemented with a variety of side dishes that enhance their spooky charm. Here are some great options.
- Pumpkin Soup: A warm and creamy soup that adds seasonal flavors to your dessert spread.
- Cheesy Breadsticks: Crispy breadsticks served with marinara sauce are perfect for dipping between cookie bites.
- Vegetable Platter: Fresh veggies like carrots, cucumbers, and bell peppers served with ranch dip offer a crunchy contrast.
- Mini Pizzas: Create mini pizzas topped with ghost-shaped cheese for a fun Halloween twist.
- Candy Corn Trail Mix: A mix of candy corn, nuts, and pretzels brings a sweet and salty balance to your dessert table.
- Apple Slices with Nut Butter: Sliced apples paired with almond or peanut butter provide a healthy and tasty option alongside sweets.
Common Mistakes to Avoid
When making Ghost cookies, it’s easy to slip up. Here are some mistakes to watch out for:
- Skipping the Icing Sugar: Forgetting to add icing sugar can lead to cookies that don’t hold their ghostly shape. Always sift and measure it carefully.
- Overheating the Cookies: If you leave your cookies in the oven too long, they can become hard. Check them a minute or two before the recommended time.
- Using Non-Vegan Marshmallows: Regular marshmallows won’t work for this recipe if you’re aiming for vegan treats. Make sure to choose vegan marshmallows.
- Neglecting the Black Writing Icing: The black writing icing is crucial for adding ghostly faces. Don’t skip this step, as it completes the spooky look.
- Not Chilling the Cookies Before Decorating: If your cookies are warm, the icing may slide off. Let them cool completely before decorating.
Storage & Reheating Instructions
Refrigerator Storage
- Store Ghost cookies in an airtight container.
- They can last up to 5 days in the fridge.
Freezing Ghost cookies
- You can freeze them for up to 3 months.
- Use freezer-safe containers or wrap individual cookies tightly in plastic wrap.
Reheating Ghost cookies
- Oven: Preheat to 350°F (175°C) and heat for about 5-10 minutes until warm.
- Microwave: Heat on medium power for 10-15 seconds. Be careful not to overheat.
- Stovetop: Place a cookie in a pan on low heat for a few minutes, flipping halfway through.
Frequently Asked Questions
Here are some common questions about making Ghost cookies:
Can I use regular cookies instead of chocolate chunk?
Yes, feel free to use any cookie type you prefer as the base for your Ghost cookies.
How do I decorate my Ghost cookies?
Use black writing icing to draw spooky faces on each cookie after they’ve cooled down completely.
How long do these Ghost cookies last?
Stored properly, they can last up to 5 days in the refrigerator or 3 months in the freezer.
Are Ghost cookies suitable for kids?
Absolutely! These fun treats are perfect for kids and can be a great Halloween activity.
Can I customize my Ghost cookies?
Yes! You can use different colored icing or add edible decorations like sprinkles for extra flair!
Final Thoughts
Ghost cookies are a delightful treat that brings joy during Halloween festivities. Their simplicity allows for endless customization, whether you want to change up decorations or try different cookie bases. Encourage your friends and family to join in and create their own spooky masterpieces!
Ghost Cookies
Ghost cookies are a delightful and spooky treat perfect for Halloween parties and family gatherings. These easy-to-make cookies combine the rich flavor of chocolate chunk cookies with the whimsical charm of decorated vegan marshmallows. Each cookie is transformed into a ghostly delight that brings festive fun to your celebrations. Whether you’re hosting a Halloween bash or looking for a creative baking activity with kids, this recipe is sure to impress.
- Prep Time: 15 minutes
- Cook Time: 5 minutes
- Total Time: 20 minutes
- Yield: Approximately 9 servings 1x
- Category: Dessert
- Method: Baking
- Cuisine: American
Ingredients
- 175g icing sugar
- 200g chocolate chunk cookies
- 9 vegan marshmallows (regular size)
- Black writing icing
Instructions
- Preheat your oven to 180°C (350°F) and line a baking sheet with parchment paper.
- Decorate the vegan marshmallows with spooky faces using black writing icing and set aside.
- Place each chocolate chunk cookie on the prepared baking sheet.
- Dust icing sugar over the cookies using a sieve for a ghostly appearance.
- Top each cookie with one decorated vegan marshmallow.
- Bake in the preheated oven for about 5 minutes until the marshmallows soften slightly.
- Allow cookies to cool completely before serving.
Nutrition
- Serving Size: 1 serving
- Calories: 150
- Sugar: 12g
- Sodium: 50mg
- Fat: 6g
- Saturated Fat: 2g
- Unsaturated Fat: 4g
- Trans Fat: 0g
- Carbohydrates: 22g
- Fiber: 1g
- Protein: 1g
- Cholesterol: 0mg